Today we will teach you how to defragment your Windows operating system regardless of the version you have. This method that we will teach you works for the following types of systems: Windows 7, Windows 8, Windows 10.
Despite popular belief defragmenting a hard drive when you have Windows is not that complicated. If your computer is running underperforming it may be time to think about removing the fragmentation it presents.
Why defragment your Windows operating system?
In some occasions and after the passage of time your team suffers what is called fragmentation. Your desktop or laptop slows down because it takes longer to find files on the hard drive.


A fragmented file is divided, stored in different locations on the hard disk. Fragmentation of files presents no risk. A fragmented system will only be slower, no more insecure and you will not risk losing information.
What is a fact is that your computer will consume more RAM and therefore it will be slower when working with files that have been fragmented. Imagine that you must find a puzzle inside a room, but instead of being stored in one place, it has pieces spread all over the place. Your computer slows down because it first needs to find all the pieces of the file before you can work with it.
The ideal is to have files that are located inside the hard disk consecutively, so your computer will work as fast as its characteristics allow it.
In summary, if your disk is fragmenting you will never be able to squeeze the juice out of your PC, it will always work below its capabilities.
The good news is that defragmenting your computer is not only easy, it is also simple and you can do it without downloading any additional programs.
How to defragment Windows:
Remember that this tutorial will serve you for any version of the Windows operating system from version 7 to version 10.
If you prefer to learn through a video, we have left you a link at the end of the article where you can see a video tutorial in Spanish on how to defragment your computer. We have seen it and it works.
The first thing we have to tell you is that Windows should automatically perform a system defragmentation every week.
You can even check what percentage of fragmentation the hard disk presents. However, these automatic defragmentations sometimes do not work quite well, or perhaps without realizing it, you have caused your operating system to stop doing them automatically.
In this guide you will also learn how to check what percentage of defragmentation your hard drive presents.
The last thing you need to know is that solid hard drives called SSDs do need defragmentation, but in this case you can leave it to the Windows automatic processes. So if you have one of these, you shouldn’t keep reading The Guide.
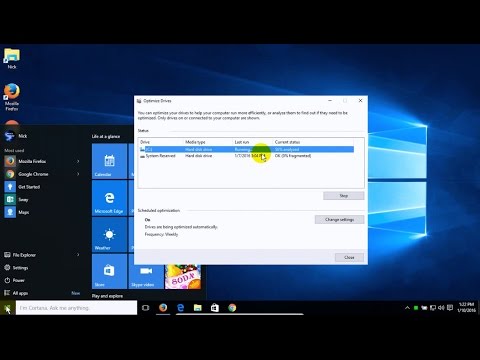
Step One: Open the Hard Drive Optimization Tool.
Open the Windows menu and in the search engine type the word “defrag” or the word “optimizer” in case your computer is configured in Spanish.
Look for the defragmenter icon that looks like the one we show you in this photo:


Second step: Check the fragmentation percentage of the equipment.
Once you have clicked on the defragmenter tool, a window like the following will open.
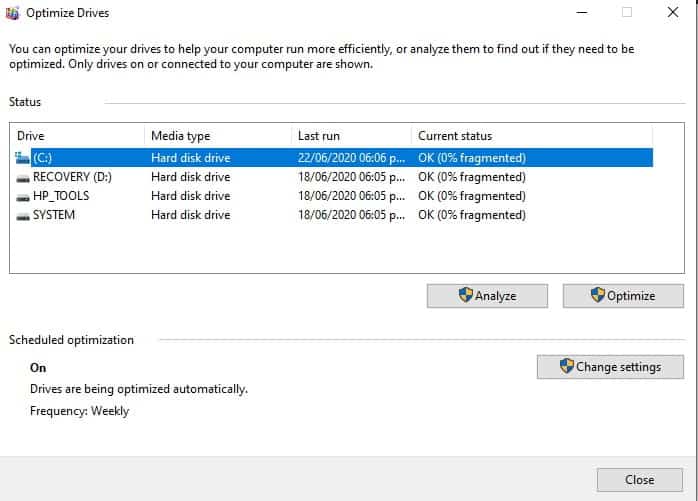

In it you can check the fragmentation status of your hard drive.
Below the list of hard drives you will have two options, one of them is to analyze and the other is to optimize. If you have a solid hard drive of type SSDs, the option to analyze will be disabled and you will not be able to click it.
If you have a traditional mechanical hard drive click on the analyze option, this way Windows will give you the actual percentage of fragmentation present on your device.
As a general rule if the fragmentation is more than 5%, you must apply a defragmentation process. The problem of letting these maintenance passes and that accumulates above 5% is that it will take too long to complete the process .
Step Three: Defragment your team if necessary: ??
If the fragmentation percentage is not below 5%, click on the optimize option.
Remember that if you have a solid hard drive you can skip this step and let Windows do its work automatically.
Once you click optimize, Windows will begin to fully defragment your hard drive.
Make sure you have enough time to let your team defragment quietly. If you need to use the computer better wait for a different time to defragment.
It is best to carry out the process only when you can do without the use of your laptop or desktop computer.
Once the defragmentation is complete, you can verify it by analyzing the hard drive again and making sure that the indicated fragmentation percentage is 0%.
Done, you know how to defragment Windows. Your computer should now run at load speeds more in line with its technical specifications.